![]()
Locost Build - progress report (latest at top of page)
22nd July 2004 - the end (for me at least)
A house move, a new girlfriend (now my wife-to-be), and ten thousand other projects, meant that the Locost made almost no progress in eighteen months. In the end I realised that I just didn't want this car as much as I wanted my track-day Golf GTI (story to come), 1967 Mustang (ditto) or Land Rover V8. So like many other would-be Locost builders, I ended up selling the incomplete vehicle to someone who, I hope, will finish the work I started. I'll leave my Locost pages up for the moment as a source of information for other. Don't let the fate of my project put you off: if lightweight two seater sports cars are your thing, and you have a fair amount of spare time, a good range of skills and not much money, the Locost formula represents more fun per £ than almost anything else. The problem with my project was that instead of just getting on with it, and sticking to Ron Champion's original design, I mucked about with it for so long that my own motoring interests changed, and the poor little Locost just ended up getting in the way of other things I wanted to do. That's my fault, not the car's.
9th June 2002
Over the last month I have been making steady progress, and I am now very close to being able to shotblast and paint the frame, and start the build-up for real. However, the project is about to come to an unscheduled halt yet again, as my landlord wants his house back at the end of July. I have found my dream home (small, tatty house attached to an enormous garage/workshop with an inspection pit) and I am waiting for my mortgage application to be approved. So meanwhile I have been concentrating on fitting as many parts to the car as possible, to make the move easier.
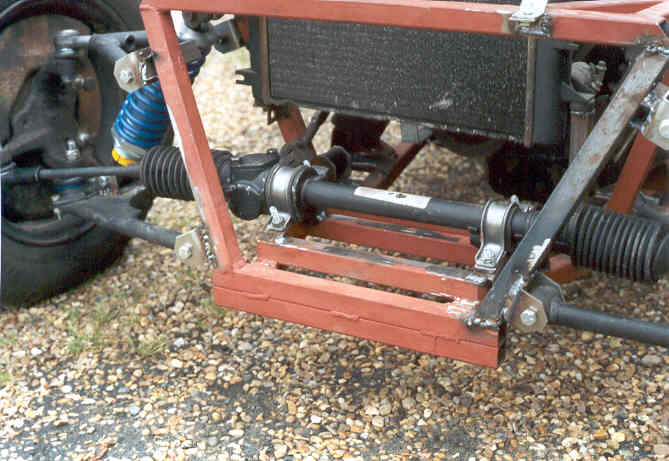
Escort steering rack in place. New clamps and rubbers were £15 from a local Ford dealer.
As I thought, the Triumph steering rack could not be persuaded to fit the revised front end, so I made up some mountings for the Escort rack, and welded up the intermediate steering shaft to suit. It uses a Triumph Vitesse clamp to allow the upper section to be adjusted for length, and now that everything is in place, I am not sure whether I need an intermediate support bearing as I thought I would. There is a lot less lateral play than I expected, and almost no play at the steering wheel, so I may leave it as it is. I ordered another set of coilovers from Lolocost - blue springs this time, which I fitted to the front, with the red ones replacing the Spitfire items on the back. The springing now seems about right, although I have had to lower the rear chassis rails under the axle to provide the necessary clearance. If you are just starting a Locost build, it will be worth curving the lower rear chassis rails under the axle - my solution looks messy, although it should be strong enough since I have two parallel rails each side rather than one.
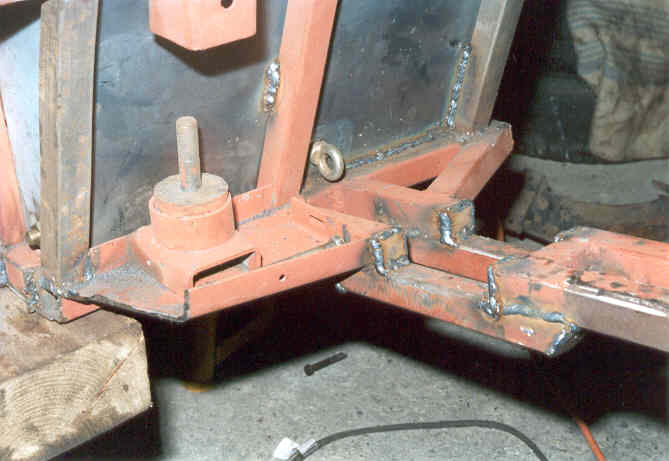
Rear chassis rails cut and welded to clear the axle. Note also the lower mounting for the race harnesses.
While I was working at the rear of the car I also fitted the Spitfire fuel tank. This was mounted as low as possible, so the top of the filler will be below the top of the rear body sides for SVA purposes. I also hired a tube bender, fettled the exhaust so that it was as close as possible to the floorpan, and fitted the Spitfire silencer box using old Triumph Vitesse engine mounts. It will need the tailpipe shortening and fitting with an SVA compliant finisher, but it seems to work fine and ground clearance should be adequate. I tried to use the tube bender to form the rails for the rear body, but the tube just kinked and buckled, even when I heated it, so I will have to get these made up by a steel fabricator.
As mentioned below, I wanted to use some saloon car type race harnesses, with the mount for the shoulder straps very low down on the chassis, and the straps looped over a crossbar between the rollover bar uprights. This proved very easy to do, and the harness has plenty of adjustment left even if I sit in the car just wearing a T-shirt, so that should be another problem solved.
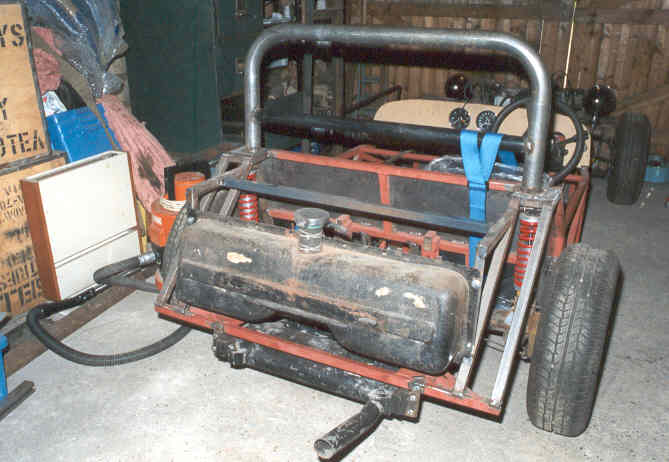
Rollbar, fuel tank, exhaust and harness all fitted.
That's probably as much progress as I am going to be able to make for the next couple of months, although I may strip and blast the chassis before I move house, since I have more space outside the garage where I am now. The main problem is that I will be sinking all my spare cash into redecorating, new furniture and boring stuff like that, so the Locost project will once again have to take a back seat. If it is going to be sitting around for a while, it would be nice if the frame were painted first - even if I have to redo a few areas later.
7th May 2002

Looks almost drivable, doesn't it? But still a long way to go.
Having decided to go with Ford suspension components (see previous report) I got on the Internet and ordered large quantities of shiny parts. A set of suspension and axle brackets came from Luego Racing, while wishbones, balljoints, suspension arms and front coilovers were purchased from Lolocost. In both cases, good service and prompt delivery - Lolocost initially sent the wrong top wishbones, but before I even had time to ring up and complain, I received a letter of apology swiftly followed by the correct wishbones and a credit note, to cover the postage cost of returning the old ones. Meanwhile I had sourced a sound 3.89 ratio Escort back axle from a retired banger racer in Cambridge, and then a request for Cortina uprights posted to the Locost newsgroup led to an e-mail from fellow Locost builder Dave Ashurst, offering not only a nice pair of uprights and callipers, but also a reconditioned Escort steering rack, unused glassfibre wings and nosecone, and a rollbar. As he was only a few miles from the big kit car show at Stoneleigh, I arranged to pick the parts up on the first morning of the show, then spent a couple of hours wandering round the trade stands, buying bolts and other little bits.
By the time I went up to Stoneleigh, I had already sorted out the rear axle location. This involved a fair bit of modification to my chassis frame, removing various brackets and relocating a few tubes. At this stage, although I had the new axle brackets I was still waiting for the suspension arms to arrive, so I used lengths of 2x1 softwood with holes drilled in them to locate the axle while I sorted out the upper mounts for the coilovers. On a visit to a breakers yard I picked up four almost new Pirelli P3000 tyres, 165/70R13 on quite pretty looking Ford steel rims for £40 the lot. I bolted the two rear wheels in place, which revealed that the clearance between tyre and suspension was going to be a bit marginal, so I will have to fit spacers and extended studs, which are easily available for Escort axles, and cheaper than changing all the wheels for ones with greater offset. My Spitfire coilovers only just fit between the axle and top mounts, and in fact the axle rests on the chassis rails on full extension, which might be a problem for SVA, but in any case I'm not sure the Spitfire units will survive for long - see below.
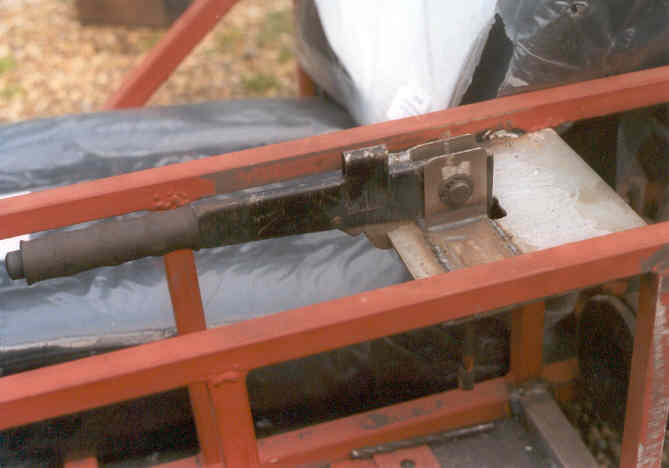
Ex Vitesse handbrake in position.
Next I decided to sort out a handbrake. I fabricated a mounting plate to suit the Vitesse handbrake lever. I also used the Vitesse rear handbrake cable, with a compensator taken from an unidentified van axle that I found in the same scrapyard as the bargain tyres. I now needed a couple of guide wheels to route the cables over the axle - these came from two Mk1 Fiestas, complete with steel mounting brackets which were simply welded onto the back of the axle casing. The finished setup seems to work fine from a cable routing point of view, but doesn't grip terribly well - I suspect this has a lot to do with the totally knackered state of the brake shoes. I need to fit some pull-off springs between the cable ends and the brake backplates (as per Triumph Vitesse) to prevent the brakes from 'dragging', but overall this is one of the simplest Locost handbrake systems I've seen. Cheap as well, and thanks to the geometry of it, when you apply the handbrake and then get out of the car, the handbrake tightens slightly as the car rises on its springs - just what you want.
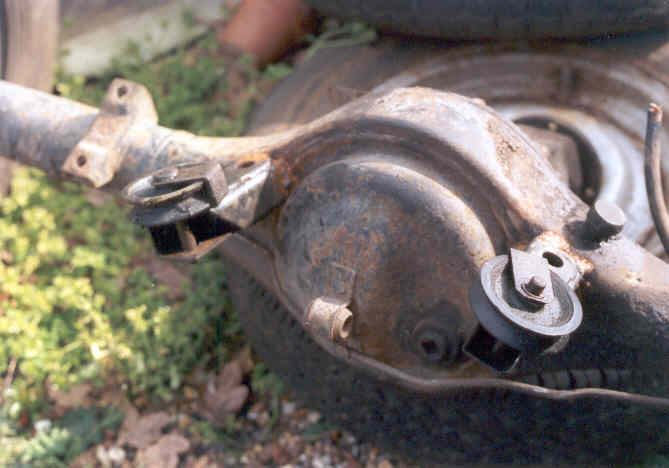
Cable guides tack welded to back axle - must remember to finish the welding before I paint it.
While I was waiting for the other bits to arrive, I fabricated a framework to hold the Spitfire fuel tank, and was amazed by how much more car-like the frame appeared as a result. It looks as though there will be enough space above the rear axle for a decent sized storage box, which I will make up from marine ply. I plan to cover the boot area (including the fuel tank filler) with a removable canvas cover, but this is some time in the future.
On the Monday of the May bank holiday I set to work at 9am, with the aim of having the car on its wheels and movable by the end of the day. This would involve fitting the front wishbones and brackets, front coilover brackets, then assembling the front and rear suspension. I already had some lower wishbone brackets on my chassis, but they had been positioned to suit my Triumph-type wishbones and were in the wrong place for the Lolocost ones. Naturally, the rear pair were almost impossible to get a grinder to, and I must have spent about an hour with a slitting disc in a minidrill, trying to remove enough of the old mounts to be able to fit the bolts through the new ones. The front pair represented the most substantial and solid piece of welding on the whole car, or so it seemed, and I ended up replacing one of the front 'picture frame' uprights after I had butchered the old one with a large disc cutter, trying to take the bracket off.

Rear view showing framework for Spitfire fuel tank.
At this point I discovered that the Lolocost wishbones, fitted with the poly bushes supplied, are about 2mm too wide for the Luego brackets. I thought about using Triumph bushes (of which I have plenty) but for some reason Lolocost have used a larger ID tube for the wishbone eyes than is shown in the book (presumably so that they could use the same poly bushes as on their own Robin Hood kit cars). I ended up using a razor saw to carefully shave 1mm off the end of each bush, then shortened the steel inner tubes to suit - a tedious job to say the least. Having done it, I discovered that with the two bushes pressed into the wishbone eye, there is a gap of at least 2mm between them, and I could have achieved the same result more quickly by taking a hacksaw and file to the wishbone eyes. I also found that the inner diameter of the steel tubes will only take 3/8 UNF bolts, whereas the holes in the brackets are pre-drilled for 7/16. So either I replace all the tubes, or weld 3/8 ID washers to all the brackets to stop the bolts moving around. Having said which, the actual wishbone fabrication is excellent, and the Lolocost wishbone kit is very cheap indeed, so you can live with the fiddling.
Once I had the lower wishbones in place, I tried locating the uppers (using the wider Luego brackets to allow castor adjustment) but it was immediately obvious that if I welded the brackets to the chassis in the 'correct' place I would be left with no castor angle, which would not be good. I'm not quite sure what I have done wrong - possibly an error in my frame dimensions, possibly the Lolocost upper wishbones aren't quite as per the book. Easy enough to correct, with a piece of square tube cut to shape and welded in to move the location for the forward upper brackets half an inch away from the frame rail. At this stage I just estimated the castor angle using a large plastic builder's square - 5 degrees isn't a lot, and I reckon that if you can see that the upper balljoint is further back than the lower one, then you've got castor, and can fine tune it later. The front suspension went together with no further problems, apart from when I forgot that a Cortina has its steering rack behind the axle line, and mounted the RH upright upside-down on the left hand side. Note - if you like negative camber, this will give you lots of it.
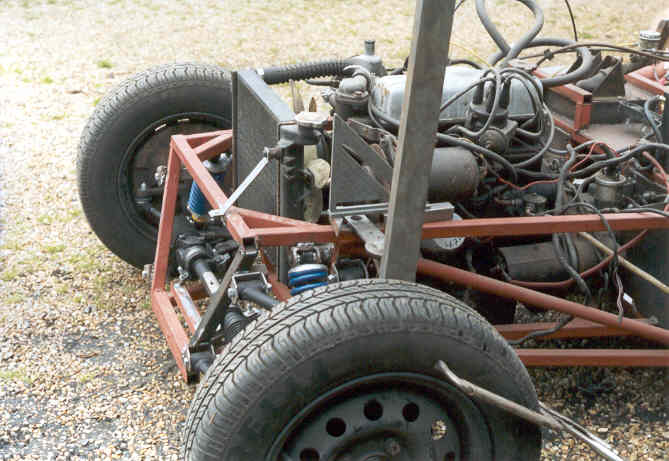
Here's a crude way of measuring castor angle. The white mark just visible on the builder's square represents 5 degrees from vertical, and the piece of steel is clamped to the tyre parallel to the kingpin centre line. Not accurate enough for setting up a race car, but a good starting point.
Now for the back axle. Again I had to shave some material off the poly bushes, but the locating arms went straight in with no problems, confirming that I had got my axle brackets in the right place. With the rear coilovers in place, I could lower the car to the ground, and rolled it back out of the garage for the first time since I stripped it to shotblast the frame last summer. An emotional moment, and unlike a year ago, I now have a suspension system that I know will work, as so many other people are using it. I couldn't resist fitting the temporary fuel tank (petrol can) and firing up the engine - a bit naughty as there was no silencer fitted. But I only have two near neighbours, and one of them races motorbikes, so I can get away with a bit of noise occasionally. With the car settled on its springs, the ride height looks near enough OK - a bit high at the front, and the springs are a little soft, but I can wind up the preload to solve both problems. The back is more difficult - I hadn't taken into account that the Spitfire coilovers are normally mounted at an angle, which reduces the effective spring rate. Mounted upright above the rear axle, they are almost solid. So I may have to splash out again, on a pair of adjustable coilovers for the rear to match the front ones. In fact this won't be a bad idea anyway, as the Spitfire top mounts make fitting the rollbar very difficult.

Land Rover centre seat - hard wearing black vinyl and very, very cheap (£35 a side).
What's next? The steering rack is now far too high up, being positioned for Vitesse uprights, so I'll have to rework the mountings. Actually, lowering it may lead to problems fitting the steering shaft, in which case I now have an Escort rack to try instead. I need to take a look at rear springs as mentioned above, and fit the Panhard rod (not entirely straightforward - one legacy of the car's former IRS existence is that the rear chassis rails are closer together than on a 'book' chassis, so the chassis end of the Panhard rod is currently suspended in mid air).
The seats (Land Rover black vinyl centre seats - cheap and a perfect fit) will simply be bolted to the floor and rear bulkhead, but harnesses will be more challenging. I bought some amazingly cheap surplus stock Securon harnesses via mail order, but they turned out to be the saloon 3-point type, so I can't use a conventional fixing. Seeing Dave Ashurst's SVA-passed car gave me an idea, as his belts pass over a cross tube which runs between the rollbar uprights at shoulder height. If I use the same setup, I can then run the belt down the back of the bulkhead to a shackle bolted to a plate on the lower chassis rails. It should be plenty strong enough, but I will have to enclose the belt where it passes in front of the axle, to protect it from damp, dirt and chafing.
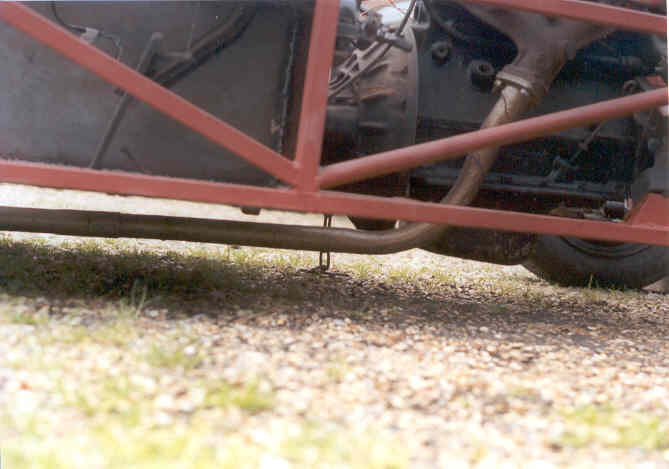
I was right about the sump - ground clearance will be minimal. Exhaust needs some fettling to tuck it out of the way.
I need to hire a tube bender to form the rear framework, and also to tweak the exhaust slightly so it runs as close as possible to the floorpan. It won't be the lowest point on the car - that honour belongs to the sump, and I may put in a skid plate to protect it. The Ford axle drive flange sticks forward a lot further than the Triumph item, so my GT6 propshaft is no longer any use. A Spitfire overdrive prop might fit (with the rear flange machined to fit the Ford axle) but failing that, I suppose I'll have to get a propshaft made up specially. Finally, I'll need to make wing mountings front and rear, and to fit the heater (if I bother with it - I'm not sure yet).
The aim is to have all this stuff done by the next Bank Holiday (beginning of June). Then over the four day break I will strip the car, finish any bits of welding I haven't done yet, sandblast the areas of metal I haven't already treated, then prime and paint the frame. I am planning to support it on a couple of trestles, with a scaffold pole through the transmission tunnel so I can rotate the chassis through 360 degrees without worrying about the paintwork. After that, the build up will start for real, with each component being cleaned and painted before being fitted with shiny new nuts and bolts. As you might have guessed, any hope of getting the car on the road this summer has long gone (although it might be drivable by Autumn) but if I can get all the heavy work done by October, I can spend the winter doing nice clean pleasant jobs like trimming and electrics. New target is next year's Stoneleigh show (early May, if it is the same as this year), followed by Newark, and then the Triumph Sports Six Club show in Staffordshire. I reckon my car is a Triumph based special if it is anything - after all, it started life as a Vitesse, even though nothing now remains of that car except the instruments, wiring, pedal boxes and handbrake. It uses a Spitfire engine, gearbox, fuel tank and (probably) steering rack, so it has more Triumph in it than anything else. We'll see if they let me in through the gate.
Click here for earlier progress reports.